
Just about every guitar has inlays of some kind. In fact some inlay designs are just as iconic as the guitars themselves. It would be hard to imagine a Les Paul without the classic trapezoid fretboard inlays or a Gibson J-200 without the crown fretboard inlays. Some inlays are just classics, but over time inlays can shrink, crack, and break just like the guitar as a whole. In this article, we’ll talk about how inlays break, how to fix them, and how to prevent your guitar inlays from coming loose in the future.
Guitar Inlay Placement and Materials
Contents
The most popular places for guitar inlays are on the fretboard, headstock, and side of the neck. These aren’t the only places for inlays however. Some guitars have inlays on the back as well as the bridge. Inlays on the headstock and bridge are decorative and serve no real function; whereas, inlays on the fretboard and side of the neck help number the frets. The traditional fretboard inlay placement has inlays on the odd frets from 3-9, the 12th fret, and the odd numbered frets from 15 on up. The 12th fret is emphasized because it’s the halfway point of the neck that marks the octave.
Inlays can be made out of all kinds of materials from wood to pearl and abalone shells. Most modern (low to mid-range) guitars don’t use traditional pearl or abalone shells because of the cost. Manufacturers started using a plastic material called pearloid instead of pearl. It looks very similar to pearl and is a fraction of the cost.
How Guitar Inlays Crack and Come Loose
To understand how guitar inlays break, it’s important to understand how they are installed. Guitar inlays and inlays in general are basically pieces of material (wood or pearl) glued into another piece of wood like a headstock. First, the inlay design is cut or carved into the headstock. Next the pearl or inlay material is cutout with a jewel’s saw to match the headstock shape. After the inlay is fitted to the headstock, it is glued in place. Over time inlays can break for a variety of reasons. Here are the most common causes of damaged guitar inlays that I see.
Temperature and Humidity
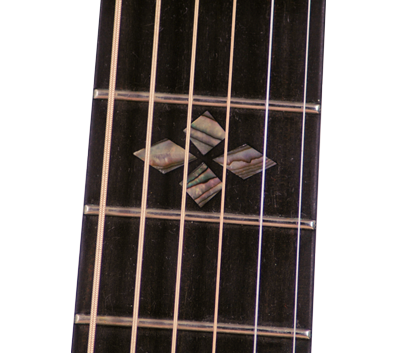
Since inlays are glued into the guitar, they are just as susceptible to changes in temperature and humidity as the guitar itself. Extreme temperature changes can loosen the glue on inlays. Extreme humidity can make the guitar wood swell and pinch the inlay material. The inlays can buckle and either crack or just come loose. This happens a lot more to block fretboard inlays like in Les Paul guitars because there is more surface area on these inlays. Simple dot fretboard inlays usually don’t have this problem.
Inlays in the body or headstock usually don’t have problems coming loose or cracking because they have finish sprayed with finish that seals and protects them. Fretboard inlays aren’t this protected and tend to have more problems. The fretboard also gets more wear and tear.
Damage
Inlays can also come loose and crack because of damage. I have seen Gibson and Ibanez acoustic guitars’ inlays crack or come loose after a bad fall. The guitar sits on a stand or leans against an amp and falls over. The neck hits a table or something on the way down and damages one of the inlays.
Improper Adjustment
The last and most infrequent cause of inlay damage that I have seen is a poorly adjusted truss rod. If a truss rod is tightened too much, it can actually bend and crack the fretboard. If the fretboard is bending right under one of the inlays, the inlay can either crack or come loose. That is why it is so important to be careful when you adjust your truss rod. Check out my truss rod adjustment article to help properly adjust your truss rod and straighten your neck.
How to Fix Broken Guitar Inlays
Now that we have a good understanding of what can go wrong with guitar inlays, let’s take a look at how to fix them. Since finished inlays like in the headstock or body rarely come loose, I will mainly focus on how to fix fretboard inlays.
Fixing or repairing broken inlays is actually pretty easy. The main thing is that you keep all the original inlay materials when they break or come loose. It’s far easier to replace the original ones than to make new ones to match the rest of the inlays. Let’s get started. First, you’ll need to remove the guitar strings.
Gluing Guitar Inlay
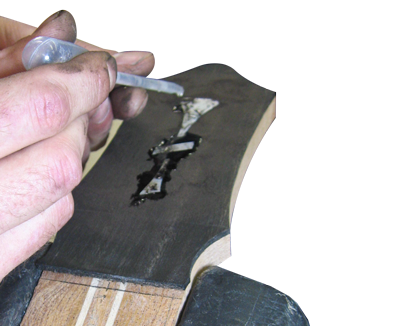
With a cracked or loose fretboard inlay, you always want to make sure the inlay is centered and lined up before you glue it. Place the inlay in the fretboard and make sure it is in line with the rest of the inlays on the fretboard. After the inlay placement looks fine, you can float some super glue around the inlay edges and over top of the inlay. I like to use Satellite City Super Glue. It holds strong and dries fast. If the inlay piece is loose in the fretboard, you can hold it in place with a toothpick or tweezers while you glue it.
Be extremely careful with the superglue. You don’t want to get it on the frets or make a mess of it on the fretboard. All you need is enough to cover the edges of the inlay or the cracked portion of the inlay. That’s all. I also like to use some accelerator to harden the glue even faster. The super glue will dry clear and invisible. DO NOT get super glue any guitar finish. It will ruin the finish and be near impossible to fix without refinishing.
Sanding the Guitar Inlay
Now that your inlay is properly glued in place, there will be a big bump of glue on top of the fretboard or inlay itself. The super glue is rock hard and is way too difficult to chisel off. The best way to remove this is to sand it down.
I like to make a small sanding block out of a scrap piece of wood. I sand one side of it down flat and stick double-sandpaper to one side. Don’t roll sandpaper around the sanding block. The edges will be raised. If you use double-stick sandpaper, the sanding surface will be nice and flat.
I usually start with 80-grit sandpaper and work my way up to 500-grit. Starting out, be very careful to only sand down the glue buildup. You don’t want to sand big divots into fretboard. Just try to hit the glue spots with the sanding block.
After you have all of the glue sanded off, you can take some #0000 steel wool and Murphy’s Oil Soap to polish up the fretboard. Here’s my article about maintaining your fretboard.
I hope this article helps and your guitar inlays turned out great! It’s time to string up your guitar and get back to playing.
