
 Removing the frets on an electric guitar is a fairly easy and common repair. Before I explain how to remove guitar frets, I think it is important to discuss some reasons why frets need to be removed.
This way you will be able to diagnose any fret problems and see if it is really necessary to take the frets out of the fretboard.
Reasons for Removing Guitar Frets
Contents
Worn Frets
There are many reasons why you will need to remove or replace your guitar frets. Over time frets get worn down from the constant friction of the strings. You can tell that your frets are worn down when you pull the strings off to the side and you can see divots in the frets where the strings usually are. The divots can be leveled out and your frets will play like new again; however, you can only level and dress your frets so many times until there isn’t enough material left on the frets. In this instance, the frets are so worn down that they need to be replaced.
Damaged Frets
Another reason to replace a fret is because it might be damaged. Dropping a guitar on the ground or on another guitar can hit a fret and put a large dent in it. It will be easier to replace this fret than to try to level all the frets down to the dented fret’s height.
Improperly Seated Frets
One reason a fret might need to be removed is that the fret is improperly seated in the fret slot. Usually, an improperly seated fret causes string buzzing. You can tell whether your fret is not seated properly by looking at the base of the crown and the fretboard. There should be no space between the two.
The base of the crown should sit flat against the fretboard. Usually, improperly seated frets are caused by faulty installation. The fret slot might not be deep enough for the fret tang or the fret might not be pressed in the fret slot far enough. Regardless the cause of the improperly seated fret, it needs to be removed and seated in the fret slot properly.
Now that you know why some frets may need to be removed, let’s check out the tools you will need to do it.
Fret Removing Tools You Will Need
Here is a list of fretting tools you’ll need to remove a guitar fret and do most other guitar fretting repairs.
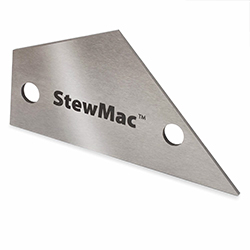
Fret Cutter
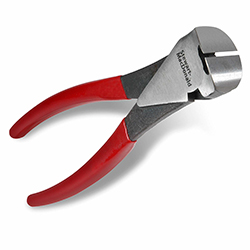 A fret end cutter is a specially designed end nipper that is ground down for specific fret repairs. The low profile allows you to get under the fret bead and pull the fret out of the fret slot. It’s also used for cutting frets flush with the edge of the fretboard.
Fret Slot Cleaning Tool
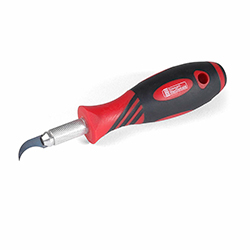 After you pull the fret out of its slot with the fret cutter, you will need to clean the slot of any debris and left over glue. The easiest way to do this is to use a hooked fret slot cleaning tool.
Fret End File
 A fret end file is designed to evenly file down the fret ends that hang off the fretboard. After you install a new fret, it will likely be a little oversized. That’s no problem. Use this tool to file them down flush with the edge of the fretboard.
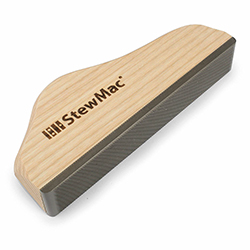
Fret Rocker
 Once you install a new fret, it will most likely not be the same height as the other frets around it. This handy tool helps you check the flatness and levelness of each fret.
Complete Fret Repair Tool Kit
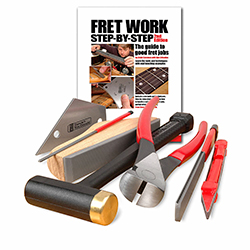 There are a bunch of different tools you will need to do general fret repair work. This is a nice set that has just about everything you will need to do most fret jobs.
Steps to Remove a Guitar Fret
Guitar frets are usually glued into the fret slot. Some manufacturer have made their fret slots so tight that the fret does not need glue to stay in the slot, but the vast majority of manufacturers use some kind of glue to hold the frets in place. It is important to know what kind of guitar you are removing the frets on. Different guitar manufacturers have installed frets differently over the years.
For instance, early Fender guitars had their frets slid in the fretboard side ways rather than pressing the frets straight down into the slot. This is important to know because if you try to pull a sideways Fender guitar fret straight out, you will probably take some of the fretboard off with the fret. I will go through the basic steps to removing different styles of frets on the following electric guitars:
- Early Fender Guitars
- Modern Fender Guitars
- Gibson Guitars
- Guitars with Maple and Lacquered Fretboards
How to Remove Vintage Fender Guitar Frets
As I stated previously, early Fender guitars had their frets pushed in from the side of the fretboard. Most likely, Fender did this because he didn’t have to use glue to hold the frets in place. Sliding the frets in from the side creates notches in the fret slot that make it almost impossible to pull straight out of the fretboard with normal wear.
The only problem with installing frets this way is that it is a pain to remove the frets for repairs. Modern Fender frets are pressed straight into the fretboard. So if you have a modern Fender guitar, you will not need to slide the frets out of the fretboard sideways. Here are a few steps to removing frets from an early Fender guitar.
- First, remove the strings from the guitar.
- After the strings have been removed, remove the neck from the body. This is easy to do with a Fender guitar. Simply, unscrew the neck screws and the neck will slide right out of the neck pocket.
- Once the neck is removed, you can start removing the frets. Look at the ends of the frets and see which way the frets were slid into the fretboard. Clamp the neck in place and place a nail set on the end of the fret. Use a hammer to lightly hit the nail set and drive the frets out sideways. The fret should slide right out of the slot. Be careful not to hit the fret to hard. A large jerk of the fret can cause the fretboard to chip. If any chunk of the fretboard comes off, save it. We can glue it back on once the frets are removed.
- The next step in the process is to clean the fret slot and replace the fret. For more instructions on how to replace guitar frets, see the replace electric guitar frets page.
How to Remove Fender Guitar Frets
Modern Fender guitars have their frets pressed straight into the fretboard. You do not have to worry about driving the frets out sideways. Also, modern Fender guitars usually use glue to hold their frets in place, so you will have to heat up the glue. Here are the steps to removing the frets on a modern Fender guitar.
- First, remove the strings from the guitar.
- After the strings have been removed, remove the neck from the body. This is easy to do with a Fender guitar. Simply, unscrew the neck screws and the neck will slide right out of the neck pocket.
- Once the neck is removed, you can start removing the frets. Take a soldering gun and file a notch in the end of soldering tip just big enough for the fret wire to fit in.
- Plug the soldering gun in and run the tip of the gun across the length of the fret. Heat the fret evenly and make sure to stay at least 1/8″ away from the edges of the fret. You do not need to heat the fret up very much. All you need to do is heat the fret up enough to loosen the glue in the fret slot.
- Use a pair of flush ground end nippers to lift the fret out of the fret slot. You should not have to pull the fret out of the slot. Slimply, open the nippers, place them flat on the fretboard around the fret, and clamp the nippers shut. The fret should lift itself out of the fret slot.
- Keep clamping the end nippers across the fret in 1/8″ increments until the fret is removed from the flet slot.
- The next step in the process is to clean the fret slot and replace the fret. For more instructions on how to replace guitar frets, see the replace electric guitar frets page.
How to Remove Gibson Guitar Frets
Gibson guitars can be more complicated to remove and replace frets than Fender guitars. Many Gibson guitars have had bound fretboards over the years. In addition, many Gibson guitars have had nips on their fretboard binding.
For more information about nips on fretboard binding, see the fretboard binding nips page. Bound fretboards look nicer, but they also create much more work when it comes to re-fretting the guitar. Here are a few basic steps on how to remove frets from a fretboard with binding.
Removing Frets with Fretboard Binding
Usually on bound fretboards, the fret tangs are cut just shy of the binding and the fret crowns are laid on top of the fretboard binding. To remove a fret like this, follow the same steps as the modern Fender guitars only do not use a soldering gun. Since most Gibson guitars have set necks or glued necks, you cannot remove the neck to repair the frets. You do not want to use a soldering gun to heat the frets on an electric guitar neck that is still attached to the electric guitar body. It can damage the pickups. Here are the steps to removing frets from a Gibson guitar with a bound fretboard.
- First, remove the strings from the guitar and clamp the neck in place.
- DO NOT use a soldering gun to heat up the fret on a Gibson guitar, as you cannot remove the neck from the body easily. You could damage the pickups.
- Use a pair of flush ground end nippers to lift the fret out of the fret slot. You should not have to pull the fret out of the slot. Slimply, open the nippers, place them flat on the fretboard around the fret, and clamp the nippers shut. The fret should lift itself out of the fret slot. Since you are not heating up the frets with a soldering gun, the frets may be slightly more difficult to pull out of the fret slots than if you had used a soldering gun. Be careful while pulling the frets; you do not want to chip the fretboard.
- Move across the fret in 1/8″ increments until the fret is removed from the flet slot.
- The next step in the process is to clean the fret slot and replace the fret. For more instructions on how to replace guitar frets, see the replace electric guitar frets page.
Removing Frets with Fretboard Binding Nips
Many vintage and modern Gibson guitars have “nips” on their fretboard binding. These nips are raised portions of the binding that mimic the edge of the fret lying on top of the binding.
Needless to say, it is a pain to deal with these nips. You should keep them on your guitar. Do not file them down or cut them off; it will destroy the value of your guitar. Removing a fret with nips on the fretboard binding follows the same set of instructions as a Gibson guitar with a bound fretboard. Just be careful not to damage the nips as you pull the fret out of the slot with the flush ground end nippers.
Removing Frets with Maple Necks/Fretboards and Lacquered Fretboards
Many times electric guitars will have lacquer sprayed on their fretboards. Most often, these fretboards are made out of maple. The frets are usually installed before the lacquer is sprayed on the fretboard. This means the frets will also be strayed with lacquer. If you follow the same steps that I mentioned above to remove these frets, the lacquer will chip and crack on both the fretboard and the neck.
In order to remove these frets, take an X-acto knife and score the lacquer all around the base of the fret. Scoring the lacquer will help prevent chipping when the frets are removed. Follow the same instructions that I mentioned above after you score the lacquer. Be careful with the flush ground end nippers, as you can still chip the lacquer with these. For more instructions on how to install guitar frets on a maple fretboard, see the installing frets on a maple fretboard page.
Related articles:
- How to do common Fret Repairs on Electric Guitars
- How to Dress Electric Guitar Frets
- How to Remove Electric Guitar Frets
- How to Bend Electric Guitar Frets
- How to Fret and Electric Guitar
- How to Fret an Electric Guitar with a Bound Fretboard
- How to Fret an Electric Guitar with an Unbound Fretboard
- How to Fret a Maple Neck Guitar
- How to Repair Loose Fret Ends
- How to Choose Fret Wire
- How to Polish Guitar Frets
- Learn Guitar Online
